

The digital landscape grows more complex every day, and staying ahead in cybersecurity has never been more important. For IT professionals, cybersecurity learners, and tech enthusiasts, a HomeLab can be a game-changing environment for learning, testing, and innovating. Add CasaOS to the mix—a lightweight yet powerful open-source operating system—and you’ve got the perfect foundation for building a secure, efficient, and future-ready HomeLab.
This guide will walk you through setting up your HomeLab with CasaOS, using it as a platform for cybersecurity training, and future-proofing it for the digital challenges of tomorrow.
Why Build a HomeLab?
Creating a HomeLab is like building a personal IT playground. It’s a private setup where you can experiment with IT security measures, prepare for cyber incident response scenarios, tackle cybersecurity training challenges, or even enhance network solutions for small businesses. Whether you’re honing skills for professional growth or testing the latest cybersecurity trends, a HomeLab enables hands-on learning at its best.
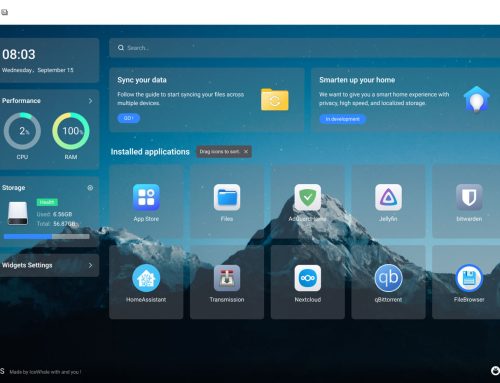
CasaOS takes this a step further with its intuitive interface, Docker support, and scalability, making it an ideal OS for building and managing a HomeLab.
Section 1: Setting Up Your Secure HomeLab
Choosing the Right Hardware
While it’s possible to create a HomeLab with a modest budget, choosing the right hardware is essential. Begin with a machine that balances performance and energy efficiency—such as a repurposed mini-PC, a Raspberry Pi, or a server-grade workstation if your requirements are more intense. Ensure that your hardware supports virtualization and provides ample CPU and RAM for running Docker containers, virtual machines, and other tools CasaOS supports.
Installation and Configuration of CasaOS
Start by installing CasaOS on your chosen hardware. Here’s a simplified guide to get started:
- Visit the CasaOS website and download the latest release.
- Flash the image onto an SD card or USB drive using tools like Rufus or BalenaEtcher.
- Connect the storage device to your hardware and boot it into CasaOS.
Or just install any Linux OS. Great news Ubuntu works great! Paste this to the terminal.
curl -fsSL https://get.casaos.io | sudo bash
Follow the on-screen instructions, which are beginner-friendly, even for those new to server setups. Once installed, you’ll have access to a clean, modern interface for managing your system.
Securing Your HomeLab Network
Security is paramount for any HomeLab. Implement these measures to keep your setup safe:
- Use Strong Passwords: Protect your CasaOS admin panel and other interfaces with robust, unique passwords.
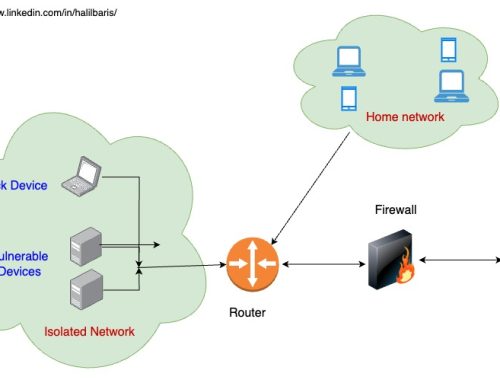
- Enable a Firewall: Configure a firewall to restrict unauthorized access to your network.
- Segregate Your Network: Use VLANs to segment your HomeLab from your home network to minimize exposure to potential attacks.
- Keep Your System Updated: Regularly check and apply updates to CasaOS and any installed software.
Section 2: Utilizing CasaOS for Cybersecurity Training
CasaOS Features for Security Testing
CasaOS excels in providing tools and features that make cybersecurity testing practical and accessible. For example, CasaOS supports:
- Docker integration, allowing you to run security tools effortlessly within containers.
- Virtualized environments that mimic real-world networks for testing attack and defence strategies.
- A centralized interface for managing and monitoring multiple services.
Implementing Docker Containers for Security Challenges
Docker enhances CasaOS significantly in the context of cybersecurity. Containers can be deployed for:
- Penetration Testing using tools like Metasploit or Kali Linux.
- Vulnerability Scanning with OpenVAS or Nessus containers.
- Threat Detection by running SIEM systems like Elasticsearch and Kibana.
You can easily launch and manage these tools within a modular, sandboxed environment.
Best Practices for Cybersecurity Training in a HomeLab
To maximize training effectiveness, follow these best practices:
- Maintain isolation between your training and home networks.
- Document all experiments, scenarios, and outcomes for reflection and improvement.
- Blend automation and manual effort to replicate real-world incident responses. CasaOS configurations can aid in setting up automated alerts or scripts to simulate breaches.
Section 3: Future-Proofing Your HomeLab with CasaOS
Adapting to Cybersecurity Trends and New Technologies
The cybersecurity landscape evolves quickly. To keep your HomeLab relevant:
- Set up regular updates for CasaOS and your Docker containers to integrate the latest tools.
- Stay informed about emerging cybersecurity trends, such as zero trust, endpoint security enhancements, and AI-driven threat detection.
The Role of HomeLabs in Preparing for Cyber Incident Response
By simulating real-world attack scenarios, a HomeLab helps you build skills in detecting, containing, and responding to cyber incidents. CasaOS further simplifies this process, thanks to its ability to manage multiple virtualized environments for dynamic threat response simulations.
A secure HomeLab is not just a fancy tech endeavour—it’s a powerful tool for enhancing IT security skills, navigating cybersecurity trends, and building preparedness for challenges in the rapidly changing digital space. CasaOS stands out as an incredible base for your HomeLab, whether you’re new to cybersecurity or a seasoned professional looking to upskill.


